Hallo Ihr Lieben, mal ehrlich, wer kennt das nicht? .....da hat man eine so schöne filigrane Stanze, stanzt sie aus Designpapier o.ä. aus, will sie auf die Karte bringen und dann .....verschmiert der Kleber, weil man selten so fein arbeiten kann, dass man Klebereste nicht mehr sieht. Stimmts?? Zugegeben, auch mich hat das schon das eine oder andere mal geärgert, aber jetzt habe ich DAS Produkt gefunden, mit dem man mühelos filigrane Stanzteilchen ordentlich und ohne Kleber-Kleckern auf sein (fast) fertiges Werk bekommt. Das Zauberwort heißt Stick-ItHi Everyone, honestly, who does not know this? .....there is a beautiful filigree die, we cut them out of patterned paper, want to stick it to the card and then ..... the glue smudged, isn't it??
Added thereto I was annoyed already, but now I've found THE product You can easily get filigree punched parts on your creations, neat and without adhesive spills The magic word is Stick-It
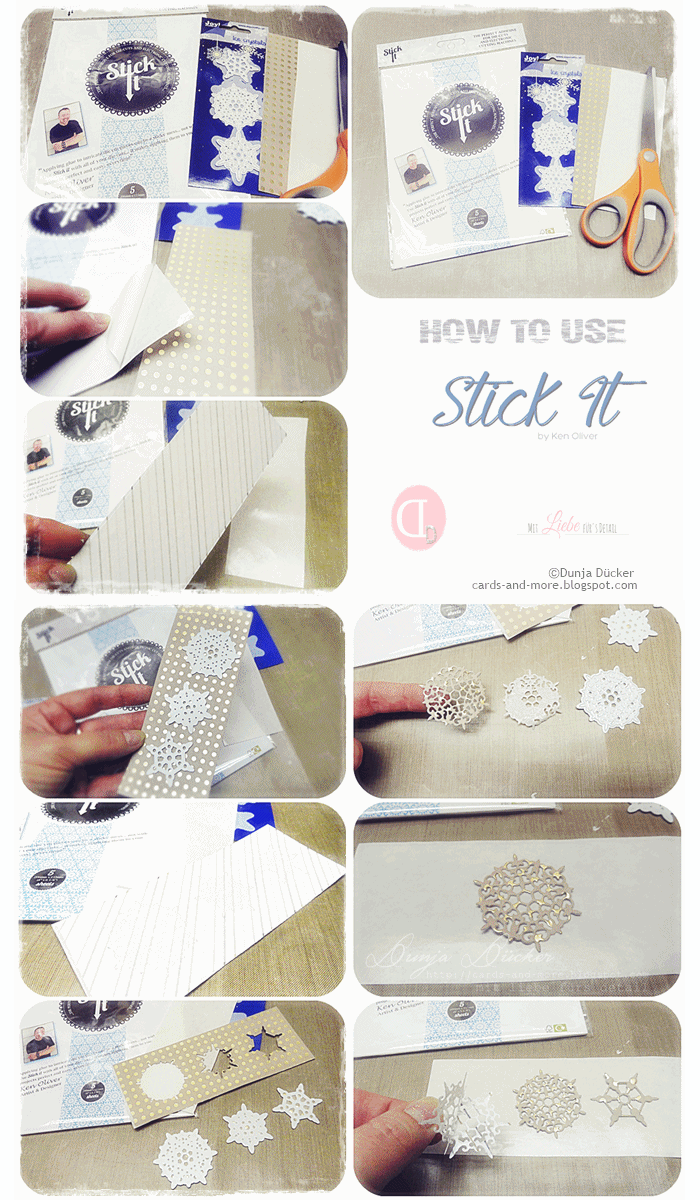
 Im Cards und More Shop gibt es diesen Artikel und ich musste ihn unbedingt testen. Dazu habe ich diese wirklich filigranen Eiskristall Stanzen von Noor! Design verwendet. Wenn Ihr die Bilder seht, könnt ihr erkennen, wie sauber und ordentlich es aussieht. This product was new to the Cards und More Shop and i had to try it. I've used the Icecristall Die by Noor! Design. Look at the pictures and see, that it's pretty easy to use. Ihr nehmt einen Bogen Stick-It, schneidet ihn passend zu der Größe des Designpapier. Klebt es auf die Rückseite - achtet darauf, dass keine Luftbläschen entstehen - legt die Stanzen auf und kurbelt das ganze durch Eure Maschine - so wie immer. Anschließend nehmt ihr die Ausstanzung aus der Schablone, zieht die transparente Folie ab und klebt das Stanzteil auf - der Clou: Es ist selbstklebend und hält! Cut a piece of Stick It to the size needed for your project. Peel away the protective layer to expose the adhesive, using the handy easy-peel area running along the length of the sheet. Apply Stick It to the reserve side of the material you wish to die-cut, taking care to avoid creases or air bubbles. Die-cut your chosen material in the usual way. Once you have removed your cut shape from the die, simply remove the protective layer from the back and Stick It. The adhesive has been specially formulated to remain repositionable for a period and will become permanent over time. Stick It ist in zwei Größen lieferbar | Stick it is available in two different sizesLarge (208mm x 310mm) + Handy (155mm x 208mm)

Die fertige Karte, auf der ich diese Eiskristalle verwendet habe, zeige ich Euch demnächst!
The card, where i've used the icecristalls i'll show you soon.

Share some Love | Follow me


 ♥ Danke | Thanks