D Jeder unter euch der gern fotografiert kennt es wohl, man macht ein richtig tolles Foto, zieht es sich zu Hause auf den Computer und erst dort fällt einem auf: der Horizont ist total schief. Meistens frage ich mich, wie mir das beim schließen des Bildes nicht auffallen konnte, aber meistens tut es das einfach nicht. Nun gut, früher habe ich dafür immer das Programm ShiftN verwendet, das das alles automatisch macht. Auf dem neuen MacBook hatte ich dann aber keine Lust dieses Programm herunterzuladen und dachte mir: das geht sicher auch mit Photoshop. Und es ist in der Tat gar nicht so schwierig. In meinen Augen ein wahrer Life Hack und das nicht nur für Fotografen, sondern auch für den alltäglichen Gebrauch. Daher schreibe ich heute mal einen kleinen Post über das begradigen von Horizonten. Wie immer nutze ich Photoshop CS2, in neueren Versionen funktioniert das aber sicher ähnlich.
E Everybody of you photography fans may know it: you take a really great photo and than at home you put it on your computer and something really silly happens: the horizon is oblique. Most of the time I ask myself how this could happen, but often it just doesn't attract attention. Previous I always used the program ShiftN to straight my horizons but on my MacBook I didn't wanted to install it. So I taught myself how to do it with Photoshop, which by the way isn't that hard. Today I want to tell you this little Life Hack: How do you straight oblique horizons. As always I use Photoshop CS2, but I think the newer versions are still doing it alike.

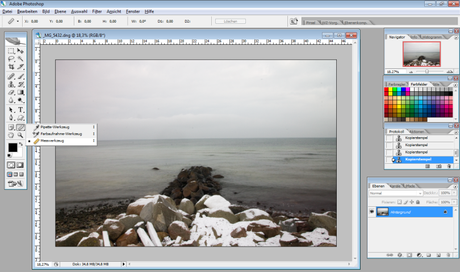
D Als erstes mal müsst ihr dem Programm zeigen, wo euer Horizont ist, das macht ihr mit dem "Messwerkzeug" in meiner Photoshop Version findet man das mit einem Rechtsklick auf das Pipetten-Werkzeug. Damit markiert man dann den Horizont des Bildes, daran sieht man übrigens auch nochmal wie schief er eigentlich ist.
E First of all you have to show the program where your horizon is, for that you have to use the Measure, in my Photoshop Version you have to right click on the Eyedropper for that. With the Measure you now mark the horizon of the picture, in this step you see how oblique your horizon actually is.


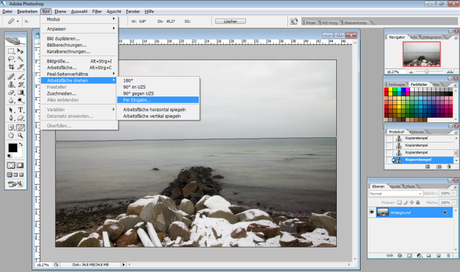
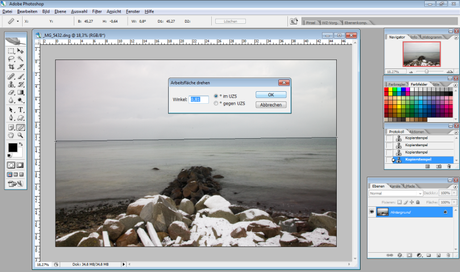
D Als nächstes geht es daran, das Bild so zu drehen, dass der Horizont gerade ist. Dafür geht ihr auf den Menüpunkt "Bild" und dort auf "Arbeitsfläche drehen" und wählt "Per Eingabe...". Nun ist Photoshop zum Glück so schlau und zeigt euch gleich den richtigen Wert, um den ihr drehen müsst, das Fenster das aufpopt könnt ihr also einfach mit "Ok" bestätigen. Jetzt sollte der Horizont gerade sein.
E Now you need to twist the picture so that the horizon is straight. For that you have to choose the Menü "Image", "Rotate Canvas" and than "Arbitrary". Photoshop is that intelligent to now show you the right value and so most of the time you just have to click "okay" and the horizon is straight.


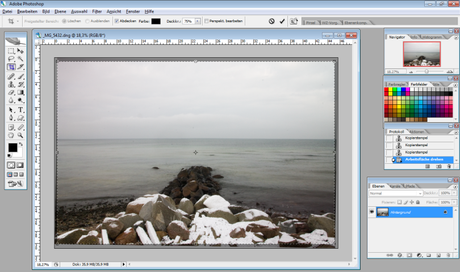
D Das nächste Problem ist, dass das Bild nun gedreht wurde und damit weiße Ränder entstehen. Das müssen wir jetzt noch beschneiden, dazu wähnt ihr einfach das Freistellungswerkzeug. Ich versuche immer so nah wie möglich an den weißen Rändern zu schneiden, damit nicht zu viel vom Bild verloren geht. Jetzt wird das ganze noch freigestellt und fertig sind wir: der Horizont ist endlich gerade und das Bild damit gerettet.
Da dieser Trick so schnell geht, mache ich das inzwischen bei jedem Bild auf dem ein Horizont zu sehen ist einfach testweise. Schließlich verschätzt man sich da manchmal ganz schön, oder man selbst nimmt es als gerade wahr und andere als schief. Photoshop berechnet das sehr präzise - zumindest ist mir noch nichts anderes untergekommen - und somit kann man sich in wenigen Sekunden absichern, dass das Bild kein totaler Reinfall ist.
E The next problem is that your picture now has white surroundings. For that you just have to crop it. I always try to cut as near on the white surroundings as I can, because otherwise you loose a lot of your picture. Well, that's it. Pretty easy isn't it?
That Life Hack is so fast, that I now do it on nearly every photo I have - certainly only when you see a horizon. Because sometimes you just don't see that the horizon isn't straight. And Photoshop is pretty good in calculating it.


D Möchtet ihr mehr solcher Photoshop "Live Hack" Posts? Was sagt ihr zum heutigen Post? Ich freue mich über euer Feedback.
Mehr Fotografie und Bildbearbeitungstutorials gibt es hier.
E Do you want to have more Photoshop Live Hack Posts? What do you think of today's post? I would like to have some feedback.
By the way you find more photography and image editing tutorials here.


E Everybody of you photography fans may know it: you take a really great photo and than at home you put it on your computer and something really silly happens: the horizon is oblique. Most of the time I ask myself how this could happen, but often it just doesn't attract attention. Previous I always used the program ShiftN to straight my horizons but on my MacBook I didn't wanted to install it. So I taught myself how to do it with Photoshop, which by the way isn't that hard. Today I want to tell you this little Life Hack: How do you straight oblique horizons. As always I use Photoshop CS2, but I think the newer versions are still doing it alike.

D Als erstes mal müsst ihr dem Programm zeigen, wo euer Horizont ist, das macht ihr mit dem "Messwerkzeug" in meiner Photoshop Version findet man das mit einem Rechtsklick auf das Pipetten-Werkzeug. Damit markiert man dann den Horizont des Bildes, daran sieht man übrigens auch nochmal wie schief er eigentlich ist.
E First of all you have to show the program where your horizon is, for that you have to use the Measure, in my Photoshop Version you have to right click on the Eyedropper for that. With the Measure you now mark the horizon of the picture, in this step you see how oblique your horizon actually is.


D Als nächstes geht es daran, das Bild so zu drehen, dass der Horizont gerade ist. Dafür geht ihr auf den Menüpunkt "Bild" und dort auf "Arbeitsfläche drehen" und wählt "Per Eingabe...". Nun ist Photoshop zum Glück so schlau und zeigt euch gleich den richtigen Wert, um den ihr drehen müsst, das Fenster das aufpopt könnt ihr also einfach mit "Ok" bestätigen. Jetzt sollte der Horizont gerade sein.
E Now you need to twist the picture so that the horizon is straight. For that you have to choose the Menü "Image", "Rotate Canvas" and than "Arbitrary". Photoshop is that intelligent to now show you the right value and so most of the time you just have to click "okay" and the horizon is straight.


D Das nächste Problem ist, dass das Bild nun gedreht wurde und damit weiße Ränder entstehen. Das müssen wir jetzt noch beschneiden, dazu wähnt ihr einfach das Freistellungswerkzeug. Ich versuche immer so nah wie möglich an den weißen Rändern zu schneiden, damit nicht zu viel vom Bild verloren geht. Jetzt wird das ganze noch freigestellt und fertig sind wir: der Horizont ist endlich gerade und das Bild damit gerettet.
Da dieser Trick so schnell geht, mache ich das inzwischen bei jedem Bild auf dem ein Horizont zu sehen ist einfach testweise. Schließlich verschätzt man sich da manchmal ganz schön, oder man selbst nimmt es als gerade wahr und andere als schief. Photoshop berechnet das sehr präzise - zumindest ist mir noch nichts anderes untergekommen - und somit kann man sich in wenigen Sekunden absichern, dass das Bild kein totaler Reinfall ist.
E The next problem is that your picture now has white surroundings. For that you just have to crop it. I always try to cut as near on the white surroundings as I can, because otherwise you loose a lot of your picture. Well, that's it. Pretty easy isn't it?
That Life Hack is so fast, that I now do it on nearly every photo I have - certainly only when you see a horizon. Because sometimes you just don't see that the horizon isn't straight. And Photoshop is pretty good in calculating it.


D Möchtet ihr mehr solcher Photoshop "Live Hack" Posts? Was sagt ihr zum heutigen Post? Ich freue mich über euer Feedback.
Mehr Fotografie und Bildbearbeitungstutorials gibt es hier.
E Do you want to have more Photoshop Live Hack Posts? What do you think of today's post? I would like to have some feedback.
By the way you find more photography and image editing tutorials here.


